
実行環境
備忘録。2026年7月時点のWindows Updateは全て適用した状態のPC。
OpenVINOのSystem Requirementsでは、Intel CPUとARM Chipsetのみのサポートとなっているが一応AMD CPUもイケるらしい。
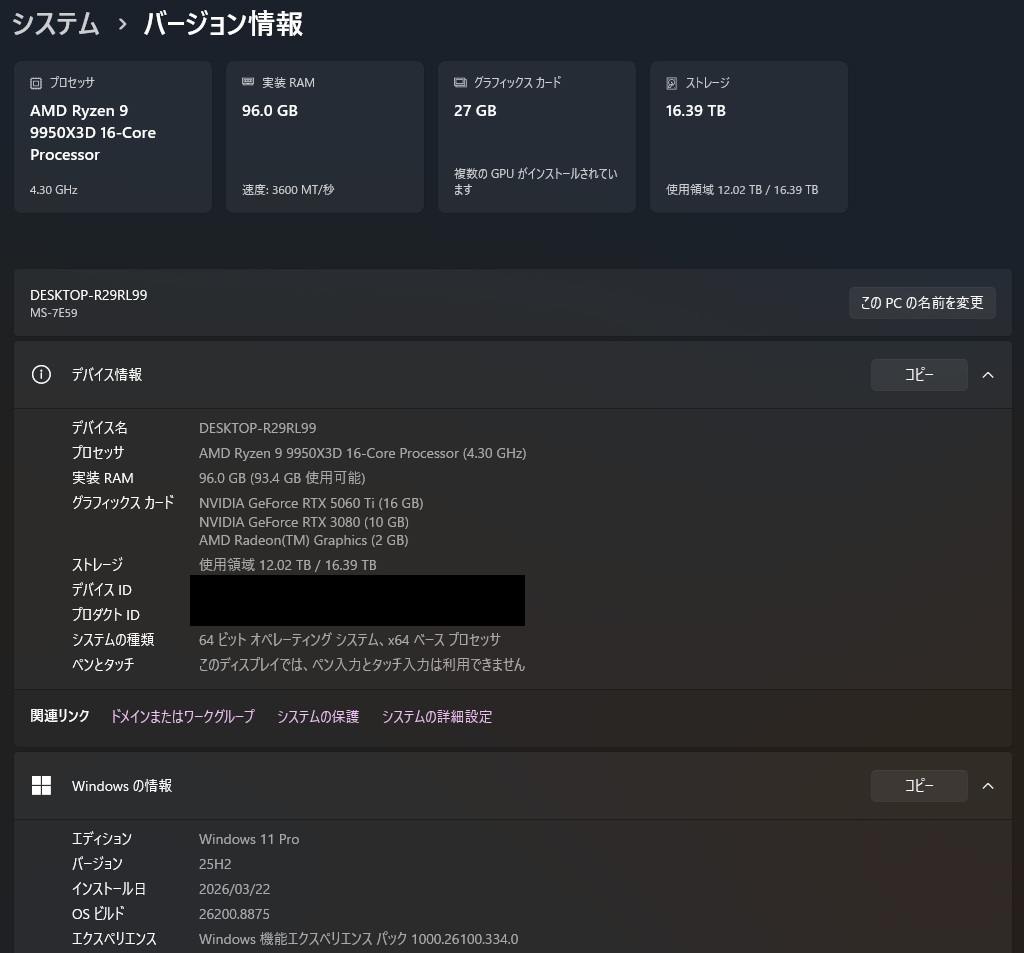


環境構築
上記System Requirementsにて、Pythonは3.10-3.14が要件とのこと。
AnacondaにてPython 3.14のまっさらな環境を作成した。
公式ドキュメントによると「OpenVINOランタイムは、動作に特定のC++ライブラリを必要とします」とのことで、以下の開発環境を推奨していた。今回はCmakeとIntelHD Graphicsドライバーのみ未インストールの環境で実行した。
- Microsoft Visual Studio 2019以降
- CMake 3.16以降
- Python 3.10~3.14
- GPU 上での推論にはIntel® HD Graphics ドライバーが必要です
Visual Studioでインストールしているコンポーネントは次のとおり。
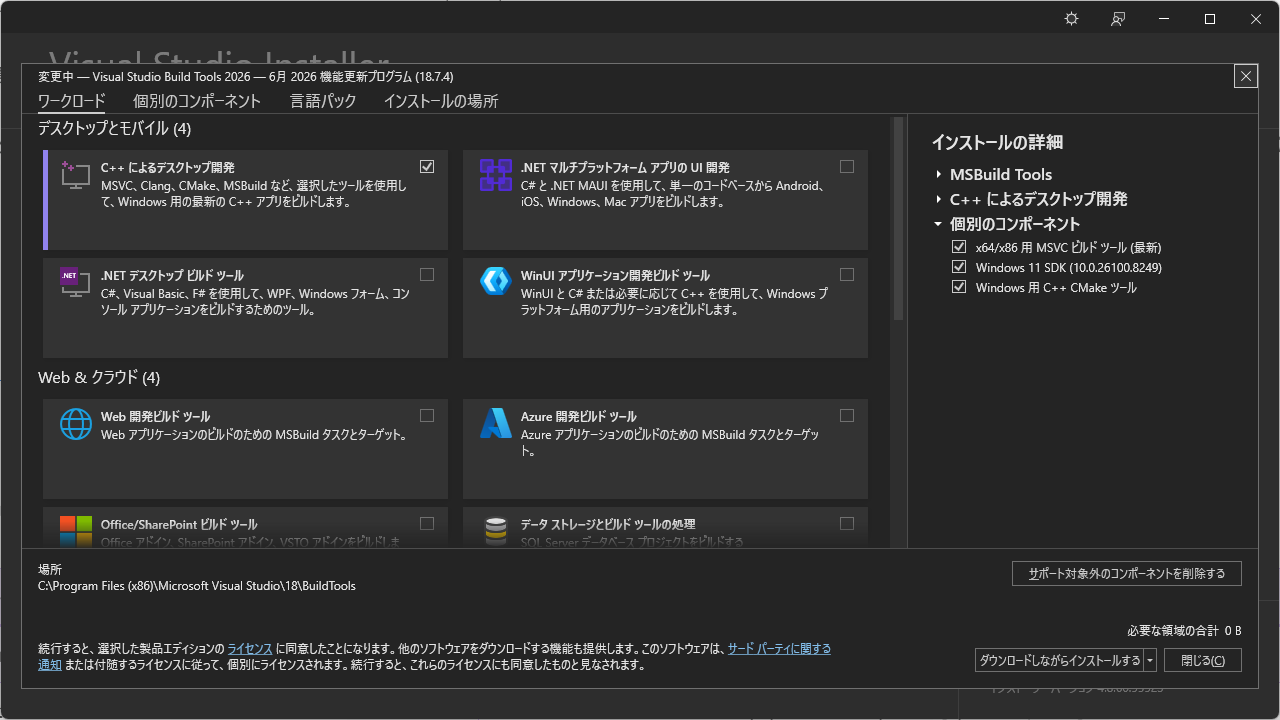
作成したPython環境には、下表のライブラリをpip installした。
| ライブラリ名 | pip コマンド |
|---|---|
| OpenVINO GenAI | pip install openvino-genai |
| Optimum Intel | pip install optimum[openvino,nncf] |
| Jupyter Lab | pip install jupyterlab |
| ipywidgets | pip install ipywidgets |
pip installするライブラリの参考にしたドキュメントはこちら。

構築後の仮想環境のライブラリは以下のとおり。
annotated-doc==0.0.4
anyio==4.14.2
argon2-cffi==25.1.0
argon2-cffi-bindings==25.1.0
arrow==1.4.0
asttokens==3.0.2
async-lru==2.3.0
attrs==26.1.0
babel==2.18.0
beautifulsoup4==4.15.0
bleach==6.4.0
certifi==2026.6.17
cffi==2.1.0
charset-normalizer==3.4.9
click==8.4.2
colorama==0.4.6
comm==0.2.3
debugpy==1.8.21
decorator==5.3.1
defusedxml==0.7.1
executing==2.2.1
fastjsonschema==2.21.2
filelock==3.30.2
fqdn==1.5.1
fsspec==2026.6.0
h11==0.16.0
hf-xet==1.5.2
httpcore==1.0.9
httpx==0.28.1
huggingface_hub==1.24.0
idna==3.18
ipykernel==7.3.0
ipython==9.15.0
ipython_pygments_lexers==1.1.1
ipywidgets==8.1.8
isoduration==20.11.0
jedi==0.20.0
Jinja2==3.1.6
joblib==1.5.3
json5==0.15.0
jsonpointer==3.1.1
jsonschema==4.26.0
jsonschema-specifications==2025.9.1
jupyter-events==0.12.1
jupyter-lsp==2.3.1
jupyter_builder==1.1.0
jupyter_client==8.9.1
jupyter_core==5.9.1
jupyter_server==2.20.0
jupyter_server_terminals==0.5.4
jupyterlab==4.6.1
jupyterlab_pygments==0.3.0
jupyterlab_server==2.28.0
jupyterlab_widgets==3.0.16
lark==1.3.1
markdown-it-py==4.2.0
MarkupSafe==3.0.3
matplotlib-inline==0.2.2
mdurl==0.1.2
mistune==3.3.3
mpmath==1.3.0
narwhals==2.24.0
nbclient==0.11.0
nbconvert==7.17.1
nbformat==5.10.4
nest-asyncio2==1.7.2
networkx==3.4.2
ninja==1.13.0
nncf==3.2.0
notebook_shim==0.2.4
numpy==2.4.6
openvino==2026.2.1
openvino-genai==2026.2.1.0
openvino-telemetry==2025.2.0
openvino-tokenizers==2026.2.1.0
optimum==2.2.0
optimum-intel==2.0.0
packaging==26.2
pandocfilters==1.5.1
parso==0.8.7
platformdirs==4.10.0
prometheus_client==0.25.0
prompt_toolkit==3.0.52
psutil==7.2.2
pure_eval==0.2.3
pycparser==3.0
pydot==3.0.4
Pygments==2.20.0
pyparsing==3.3.2
python-dateutil==2.9.0.post0
python-json-logger==4.1.0
pywinpty==3.0.5
PyYAML==6.0.3
pyzmq==27.1.0
referencing==0.37.0
regex==2026.7.10
requests==2.34.2
rfc3339-validator==0.1.4
rfc3986-validator==0.1.1
rfc3987-syntax==1.1.0
rich==15.0.0
rpds-py==2026.6.3
safetensors==0.7.0
scikit-learn==1.9.0
scipy==1.18.0
Send2Trash==2.1.0
setuptools==83.0.0
shellingham==1.5.4
six==1.17.0
soupsieve==2.8.4
stack-data==0.6.3
sympy==1.14.0
tabulate==0.10.0
terminado==0.18.1
threadpoolctl==3.6.0
tinycss2==1.5.1
tokenizers==0.22.2
torch==2.13.0
tornado==6.5.7
tqdm==4.68.4
traitlets==5.15.1
transformers==5.0.0
typer==0.27.0
typer-slim==0.24.0
typing_extensions==4.16.0
tzdata==2026.3
uri-template==1.3.0
urllib3==2.7.0
wcwidth==0.8.2
webcolors==25.10.0
webencodings==0.5.1
websocket-client==1.9.0
widgetsnbextension==4.0.15
↓今回作った環境のRequirements.txt
ちなみに、optinumをpip installするとこれらのライブラリが一気にインストールされた。
「Successfully installed annotated-doc-0.0.4 click-8.4.2 filelock-3.30.2 fsspec-2026.6.0 hf-xet-1.5.2 huggingface_hub-1.24.0 joblib-1.5.3 markdown-it-py-4.2.0 mdurl-0.1.2 mpmath-1.3.0 narwhals-2.24.0 networkx-3.4.2 ninja-1.13.0 nncf-3.2.0 optimum-2.2.0 optimum-intel-2.0.0 pydot-3.0.4 pyparsing-3.3.2 regex-2026.7.10 rich-15.0.0 safetensors-0.7.0 scikit-learn-1.9.0 scipy-1.18.0 setuptools-83.0.0 shellingham-1.5.4 sympy-1.14.0 tabulate-0.10.0 threadpoolctl-3.6.0 tokenizers-0.22.2 torch-2.13.0 tqdm-4.68.4 transformers-5.0.0 typer-0.27.0 typer-slim-0.24.0」
Transformersモデルの実行(CPU推論)
8ビット量子化での推論
以下のリンクを参考にモデルを実行してみる。
実行可能なモデルは以下のものらしい。
今回はDL済みだったQwen2.5 Coder7B itを使う。
実行したコードは以下のとおり。
import os
import psutil
import time
from optimum.intel import OVModelForCausalLM
from transformers import AutoProcessor
process = psutil.Process(os.getpid())
mem_before = process.memory_info().rss / 1024**2  # MB
start = time.time()
model_path = r"H:\LLM_Models\safetensor\Qwen\Qwen2.5-Coder-7B-Instruct"
processor = AutoProcessor.from_pretrained(model_path)
model = OVModelForCausalLM.from_pretrained(model_path)
messages = [
    {"role": "system", "content": "あなたは有能なAIアシスタントです。"},
    {"role": "user", "content": "面白いジョークを話して。またどこが面白いかも解説してください。"},
]
inputs = processor.apply_chat_template(
    messages,
    tokenize=True,
    return_dict=True,
    return_tensors="pt",
    add_generation_prompt=True,
    enable_thinking=False
).to(model.device)
input_len = inputs["input_ids"].shape[-1]
# Generate output
outputs = model.generate(**inputs, max_new_tokens=1024)
response = processor.decode(outputs[0][input_len:], skip_special_tokens=False)
mem_after = process.memory_info().rss / 1024**2  # MB
end = time.time()
print(response)
print("=" * 60)
print(f"実行前メモリ使用量: {mem_before:.2f} MB")
print(f"実行後メモリ使用量: {mem_after:.2f} MB")
print(f"実行時間: {end - start:.3f}")
# OpenVINO IR形式を保存
# 次回以降model_pathに保存済みのOpenVINO IR形式へのpathを渡せば変換が省略される。
open_vino_save_path = r"H:\LLM_Models\open_vino\Qwen\Qwen2.5-Coder-7B-Instruct"
model.save_pretrained(open_vino_save_path)
processor.save_pretrained(open_vino_save_path)
出力された情報は以下のとおり。
No OpenVINO files were found for H:\LLM_Models\safetensor\Qwen\Qwen2.5-Coder-7B-Instruct, setting export=True to convert the model to the OpenVINO IR. Don’t forget to save the resulting model with .save_pretrained()torch_dtype is deprecated! Use dtype instead!loss_type=None was set in the config but it is unrecognized. Using the default loss: ForCausalLMLoss.
c:\ProgramData\anaconda3\envs\openvino_20260717\Lib\site-packages\transformers\cache_utils.py:132: TracerWarning: Converting a tensor to a Python boolean might cause the trace to be incorrect. We can’t record the data flow of Python values, so this value will be treated as a constant in the future. This means that the trace might not generalize to other inputs!
if not self.is_initialized or self.keys.numel() == 0:
c:\ProgramData\anaconda3\envs\openvino_20260717\Lib\site-packages\transformers\masking_utils.py:171: TracerWarning: Converting a tensor to a Python boolean might cause the trace to be incorrect. We can’t record the data flow of Python values, so this value will be treated as a constant in the future. This means that the trace might not generalize to other inputs!
if (padding_length := kv_length + kv_offset – attention_mask.shape[-1]) > 0:
c:\ProgramData\anaconda3\envs\openvino_20260717\Lib\site-packages\optimum\exporters\openvino\patching_utils.py:247: TracerWarning: torch.tensor results are registered as constants in the trace. You can safely ignore this warning if you use this function to create tensors out of constant variables that would be the same every time you call this function. In any other case, this might cause the trace to be incorrect.
torch.tensor(0.0, device=mask.device, dtype=dtype),
c:\ProgramData\anaconda3\envs\openvino_20260717\Lib\site-packages\optimum\exporters\openvino\patching_utils.py:248: TracerWarning: torch.tensor results are registered as constants in the trace. You can safely ignore this warning if you use this function to create tensors out of constant variables that would be the same every time you call this function. In any other case, this might cause the trace to be incorrect.
torch.tensor(torch.finfo(torch.float16).min, device=mask.device, dtype=dtype),
c:\ProgramData\anaconda3\envs\openvino_20260717\Lib\site-packages\transformers\integrations\sdpa_attention.py:77: TracerWarning: Converting a tensor to a Python boolean might cause the trace to be incorrect. We can’t record the data flow of Python values, so this value will be treated as a constant in the future. This means that the trace might not generalize to other inputs!
is_causal = query.shape[2] > 1 and attention_mask is None and is_causal
INFO:nncf:Statistics of the bitwidth distribution:
+—————————+—————————–+—————————————-+
| Weight compression mode | % all parameters (layers) | % ratio-defining parameters (layers) |
+===========================+=============================+========================================+
| int8_asym, per-channel | 100% (198 / 198) | 100% (198 / 198) |
+—————————+—————————–+—————————————-+
もちろんです、以下にジョークを聞かせていただきます。
「なぜパン屋さんには猫がいないのですか?」
答え:猫はパンを作ります。
このジョークの面白さは、「猫」と「パン」という単語の類似性を利用しています。一般的には猫とパンは関係がないように思われますが、ジョークではその関連性を利用して笑いを生み出しています。これは言葉遊びや双关語を用いて表現したものです。<|im_end|>
実行前メモリ使用量: 484.25 MB
実行後メモリ使用量: 14306.33 MB
差引メモリ使用量: 13822.08 MB
実行時間: 83.053 秒
モデルファイルのサイズ比較は以下のとおり。ちなみに、変換時にはピークで20GB弱メモリを消費した。
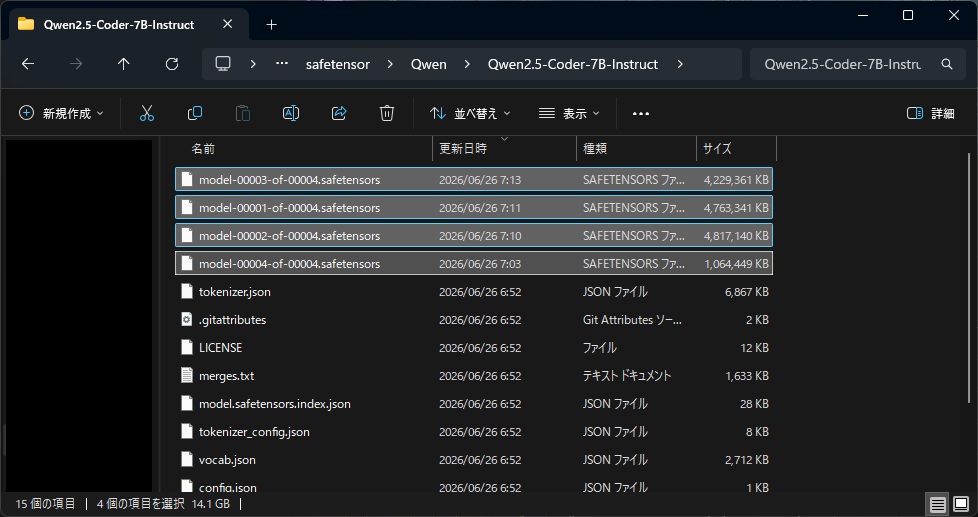
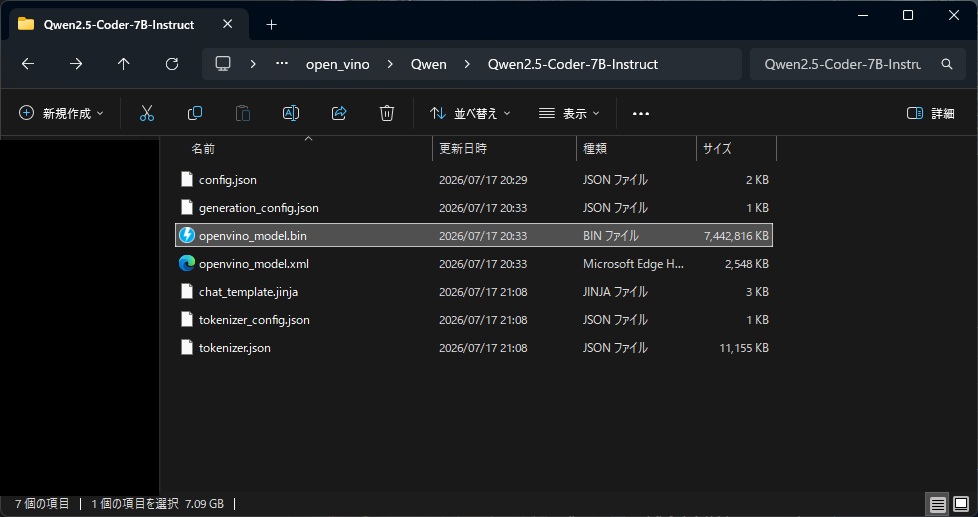
小さくなった理由としては、以下のリンク先の「If quantization_config is not provided, model will be exported in 8 bits by default when it has more than 1 billion parameters. You can disable it with load_in_8bit=False.」という記載から、1Billionを超えるパラメータ数のモデルは、特に指定しないと8ビット量子化されているためと思われ。
続いて、先ほど保存したOpenVINO IR形式のQwen2.5 Coderを読み込んで実行してみる。コードは一緒で、読み込み先のモデルパスのみ異なる。
process = psutil.Process(os.getpid())
mem_before = process.memory_info().rss / 1024**2  # MB
start = time.time()
processor = AutoProcessor.from_pretrained(open_vino_save_path)
model = OVModelForCausalLM.from_pretrained(open_vino_save_path)
messages = [
    {"role": "system", "content": "あなたは有能なAIアシスタントです。"},
    {"role": "user", "content": "面白いジョークを話して。またどこが面白いかも解説してください。"},
]
inputs = processor.apply_chat_template(
    messages,
    tokenize=True,
    return_dict=True,
    return_tensors="pt",
    add_generation_prompt=True,
    enable_thinking=False
).to(model.device)
input_len = inputs["input_ids"].shape[-1]
outputs = model.generate(**inputs, max_new_tokens=1024)
response = processor.decode(outputs[0][input_len:], skip_special_tokens=False)
mem_after = process.memory_info().rss / 1024**2  # MB
end = time.time()
print(response)
print("=" * 60)
print(f"実行前メモリ使用量: {mem_before:.2f} MB")
print(f"実行後メモリ使用量: {mem_after:.2f} MB")
print(f"実行時間: {end - start:.3f} 秒")
もちろんです、以下に面白いジョークをお伝えします。
ジョーク:「ある日、誰かが友人と話していたら、「最近、自分の人生の目標について考えているんだけど、何が一番大切なのか教えてね。」友人は答えを尋ねる。「それは何ですか?」「何でもいいんだよ。」友人は驚いて、「本当に何でもいいんだよ?」と反問した。答え者は笑って言った、「もちろんだよ。」」
このジョークが面白い理由は以下の通りです:
- 答え者の回答が単純で直感的で、予想外でした。
- 友人の反問は答え者の単純さを強調し、ジョークのギャグを高めました。
- このジョークは、人生の目標や価値観についての深い思考を促進する可能性があります。
このジョークは、シンプルさと直感性が効果的なコミュニケーションと問題解決の方法を示すことができます。<|im_end|>
実行前メモリ使用量: 696.95 MB
実行後メモリ使用量: 14376.63 MB
差引メモリ使用量: 13679.69 MB
実行時間: 61.783 秒
Transformersで同じプロンプト・8ビット量子化で推論した場合
from transformers import AutoModelForCausalLM, AutoTokenizer, BitsAndBytesConfig
process = psutil.Process(os.getpid())
mem_before = process.memory_info().rss / 1024**2  # MB
start = time.time()
quantization_config = BitsAndBytesConfig(load_in_8bit=True)
model = AutoModelForCausalLM.from_pretrained(
    model_path,
    quantization_config=quantization_config,
    torch_dtype="auto",
    device_map="auto",
)
tokenizer = AutoTokenizer.from_pretrained(model_path)
quantization_time = time.time()
messages = [
    {"role": "system", "content": "あなたは有能なAIアシスタントです。"},
    {"role": "user", "content": "面白いジョークを話して。またどこが面白いかも解説してください。"},
]
text = tokenizer.apply_chat_template(
    messages,
    temperature=0.1,
    tokenize=False,
    add_generation_prompt=True
)
model_inputs = tokenizer([text], return_tensors="pt").to(model.device)
generated_ids = model.generate(
    **model_inputs,
    max_new_tokens=512
)
generated_ids = [
    output_ids[len(input_ids):] for input_ids, output_ids in zip(model_inputs.input_ids, generated_ids)
]
response = tokenizer.batch_decode(generated_ids, skip_special_tokens=True)[0]
mem_after = process.memory_info().rss / 1024**2  # MB
end = time.time()
print(response)
print("=" * 60)
print(f"実行前メモリ使用量: {mem_before:.2f} MB")
print(f"実行後メモリ使用量: {mem_after:.2f} MB")
print(f"差引メモリ使用量: {mem_after - mem_before:.2f} MB")
print(f"実行時間: {end - start:.3f} 秒")
print(f"量子化処理を除いた推論時間: {end - quantization_time:.3f} 秒")
del model, tokenizer
ちなみに、普通にtransformersで同じモデル・プロンプトを実行した結果は以下のとおり。
c:\ProgramData\anaconda3\envs\openvino_20260717\Lib\site-packages\bitsandbytes\autograd_functions.py:123: UserWarning: MatMul8bitLt: inputs will be cast from torch.bfloat16 to float16 during quantization
warnings.warn(f”MatMul8bitLt: inputs will be cast from {A.dtype} to float16 during quantization”)
もちろんです、以下にジョークをお聞かせします。
「何が最も賢い動物ですか?」
答え:「カエル」
(カエルの「知恵」は「知らす」という言葉から来ていると言われています)
このジョークは、単純で分かりやすいですが、ユーモラスな要素があります。一般的な期待に反して、答えは意外と短く、直接的な答えを提供しています。これは、聴衆が予想外の答えを見つけることによって興味を引きます。さらに、「カエル」の「知恵」についての知識がある読者にとっては、ジョーク自体がより面白くなります。
実行前メモリ使用量: 744.62 MB
実行後メモリ使用量: 22697.21 MB
差引メモリ使用量: 21952.59 MB
実行時間: 77.135 秒
量子化処理を除いた推論時間: 59.798 秒
4ビット量子化での推論
以下のコードで、任意に量子化したモデルを出力することが可能。
import os
import psutil
import time
from optimum.intel import OVModelForCausalLM
from transformers import AutoProcessor
model_path = r"H:\LLM_Models\safetensor\Qwen\Qwen2.5-Coder-7B-Instruct"
# モデル量子化用に追加でロード
from nncf import compress_weights, CompressWeightsMode
process = psutil.Process(os.getpid())
mem_before = process.memory_info().rss / 1024**2  # MB
start = time.time()
model = OVModelForCausalLM.from_pretrained(model_path,
                                           load_in_8bit=False, # これを指定することでデフォルトの8ビット量子化を無効化
                                           compile=False,   # この段階でモデルをコンパイルしても、その後4ビットモデルを作成⇒再コンパイルすることとなり無駄となる。
                                                            # Falseを指定することでコンパイルをキャンセルできる。
                                           )
# modeを指定することで量子化モードを指定できる。指定できるパラメータは以下のマークダウンを参照。
model.model = compress_weights(model.model,
                               mode=CompressWeightsMode.INT4_ASYM,
                              )
# プロセッサも保存する必要があるので読み込み
processor = AutoProcessor.from_pretrained(model_path)
# 量子化したモデルをOpenVINO IR形式で保存
open_vino_save_path_int4a = r"H:\LLM_Models\open_vino\Qwen\Qwen2.5-Coder-7B-Instruct_INT4-ASYM"
model.save_pretrained(open_vino_save_path_int4a)
processor.save_pretrained(open_vino_save_path_int4a)
end = time.time()
print(f"実行時間: {end - start:.3f} 秒")
del model, processor
出力された情報、モデルサイズ等は次のとおり。
No OpenVINO files were found for H:\LLM_Models\safetensor\Qwen\Qwen2.5-Coder-7B-Instruct, setting export=True to convert the model to the OpenVINO IR. Don’t forget to save the resulting model with .save_pretrained()
INFO:nncf:Statistics of the bitwidth distribution:
+—————————+—————————–+—————————————-+
| Weight compression mode | % all parameters (layers) | % ratio-defining parameters (layers) |
+===========================+=============================+========================================+
| int8_asym, per-channel | 14% (2 / 198) | 0% (0 / 196) |
+—————————+—————————–+—————————————-+
| int4_asym, group size 128 | 86% (196 / 198) | 100% (196 / 196) |
+—————————+—————————–+—————————————-+
実行時間: 56.518 秒
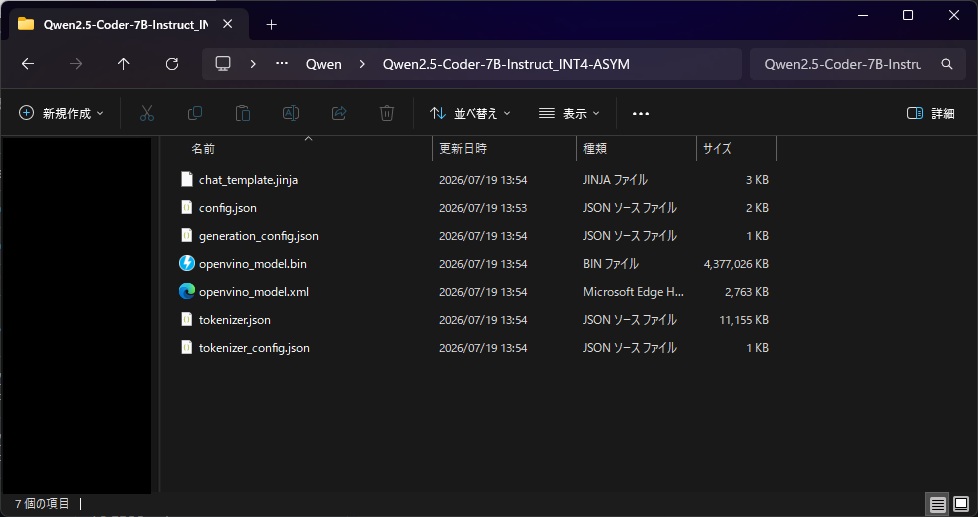
圧縮モードについては以下のリンクを参考にした。

推論結果は以下のとおり。
process = psutil.Process(os.getpid())
mem_before = process.memory_info().rss / 1024**2  # MB
start = time.time()
processor = AutoProcessor.from_pretrained(open_vino_save_path_int4a)
model = OVModelForCausalLM.from_pretrained(open_vino_save_path_int4a)
messages = [
    {"role": "system", "content": "あなたは有能なAIアシスタントです。"},
    {"role": "user", "content": "面白いジョークを話して。またどこが面白いかも解説してください。"},
]
processor = AutoProcessor.from_pretrained(model_path)
inputs = processor.apply_chat_template(
    messages,
    temperature=0.1,
    tokenize=True,
    return_dict=True,
    return_tensors="pt",
    add_generation_prompt=True,
    enable_thinking=False,
).to(model.device)
input_len = inputs["input_ids"].shape[-1]
outputs = model.generate(**inputs, max_new_tokens=1024)
response = processor.decode(outputs[0][input_len:], skip_special_tokens=False)
mem_after = process.memory_info().rss / 1024**2  # MB
end = time.time()
print(response)
print("=" * 60)
print(f"実行前メモリ使用量: {mem_before:.2f} MB")
print(f"実行後メモリ使用量: {mem_after:.2f} MB")
print(f"差引メモリ使用量: {mem_after - mem_before:.2f} MB")
print(f"実行時間: {end - start:.3f} 秒")
del model, processor
もちろんです、以下に面白いジョークをお伝えします。
ジョーク:
「何が最も強い武器ですか?答え:言葉」
解説:
このジョークの面白いのは、「言葉」という単語自体が強力な武器であることを意味していることです。言葉は私たちの思考や感情を表現する唯一の手段であり、それがどのように使われるかによって結果は大きく変わります。例えば、建設的な言葉は人間関係を改善し、破壊的な言葉は人間関係を損なう可能性があります。したがって、「言葉」は非常に強力な武器と言えるでしょう。<|im_end|>
実行前メモリ使用量: 1116.38 MB
実行後メモリ使用量: 9301.42 MB
差引メモリ使用量: 8185.04 MB
実行時間: 31.623 秒
メモリ消費・推論時間が8ビット量子化に比べて6割程度となった。
OpenVINOランタイム最適化を有効にする
「OpenVINOランタイムは、LLM推論をより効率的に行うための最適化機能を提供します。これには、4ビット/8ビット量子化されたMatMulのアクティベーションの 動的量子化とKVキャッシュ量子化が含まれます。」とのこと。

動的量子化
↓上記リンクの該当部を翻訳した。
動的量子化により、 4 ビットまたは 8 ビットの量子化重みを持つ MatMul 演算のアクティベーションの量子化が可能になります ( LLM 重み圧縮を参照)。これにより、LLM の推論レイテンシとスループットが向上しますが、生成精度にわずかなずれが生じる可能性があります。量子化はグループ単位で実行され、グループサイズは設定可能です。つまり、グループ内の値は量子化パラメータを共有します。グループサイズが大きいほど推論は速くなりますが、精度は低下します。推奨されるグループサイズ値は、0、32、64、128、または”-1″ (トークンごと) です。
注記
動的量子化グループサイズは、厳密な要件ではなく、あくまで目安として扱われます。実際のポリシーは、機能要件やパフォーマンス、精度に関する考慮事項によって異なる場合があります。プラグインによっては、動的量子化を完全に無効にしたり、ユーザーが指定したサイズよりも小さいグループサイズを使用したりする場合があります。Intel製CPUおよびIntel製GPUでは、動的量子化はデフォルトで有効になっています。
- XMXをサポートしていないIntel CPUおよびIntel GPUの場合、デフォルトのグループサイズは
32です。- XMX をサポートする Intel GPU の場合、サポートされているグループ サイズは
innermost axisのみで、デフォルトで有効になっています。動的量子化を無効にするには、次のいずれかの方法を実行してください。
- (主要オプション)
DYNAMIC_QUANTIZATION_GROUP_SIZEの値を0に設定します。- 実行モードを
PERFORMANCE modeからACCURACY modeに切り替えます。ただし、このオプションは推論精度にも影響します。PERFORMANCEとACCURACYのモードの詳細については、「精度制御ガイド」を参照してください。グループサイズの値を変更するには(例: e.g. から 64 へ)、次のコードを実行する必要があります。
model = OVModelForCausalLM.from_pretrained(
    model_path,
    ov_config={"DYNAMIC_QUANTIZATION_GROUP_SIZE": "64"}
)
XMXとは、IntelのGPU(Arcなど)に搭載されているAI・行列演算用ハードウェアエンジン(Xe Matrix Extensions)とのこと。
デフォルトで有効らしいが、Ryzenには搭載されていないので今回の検証は全て動的量子化は無効の状態。
KVキャッシュの量子化
KVキャッシュの量子化により、LLMのキーと値のキャッシュの精度を下げることができます。これにより、推論中のメモリ消費が削減され、レイテンシとスループットが向上します。KVキャッシュは、次の精度に量子化できます。
u8、u4、bf16、f16。u8またはu4の場合、グループごとの量子化が使用されます。グループサイズは、KEY_CACHE_GROUP_SIZEおよびVALUE_CACHE_GROUP_SIZEで制御されます 。キーと値の精度は、KEY_CACHE_PRECISIONおよびVALUE_CACHE_PRECISIONを使用して個別に構成できます。キーの量子化モードは、KEY_CACHE_QUANT_MODEで(より正確な)またはBY_CHANNELBY_TOKENのいずれかに設定されます。CPUおよびGPUのデフォルトのKVキャッシュ量子化設定:
- U8キー:チャネル単位の量子化、グループサイズ = 32(CPU)/ 16(GPU)
- U8 値: トークンごとの量子化、group_size = hidden_dim。
KVキャッシュの量子化を有効にするには、以下の設定を使用してください。
model = OVModelForCausalLM.from_pretrained(
    model_path,
    ov_config={"KV_CACHE_PRECISION": "u8", "DYNAMIC_QUANTIZATION_GROUP_SIZE": "32", "PERFORMANCE_HINT": "LATENCY"}
)
また、OpenVINOのリリースノートによると、デフォルトでKVキャッシュの量子化が有効らしい。
OpenVINO リリースノート
2024年6月 – 2024年12月18日
新着情報
- OpenVINO 2024.6リリースには、安定性の向上とLLMパフォーマンスの改善のためのアップデートが含まれています。
- Intel® Arc™ Bシリーズグラフィックス(旧称Battlemage)のサポートを追加しました。
- NPU上での推論時間とLLM性能を向上させるための最適化を実装しました。
- GenAI APIの最適化とバグ修正により、LLMのパフォーマンスが向上しました。
OpenVINO™ ランタイム
CPUデバイスプラグイン
- KVキャッシュは、デフォルトの精度として非対称8ビット符号なし整数(U8)を使用するようになりました。これにより、LLMのメモリ負荷が軽減され、パフォーマンスが向上します。このオプションは、モデルのメタデータで制御できます。
- 複数のバグ修正により、一部のモデルの品質と精度が向上しました。

これまでの検証ではKVキャッシュの精度は「u8」となっているため、試しに圧縮なしにしてみる。使ったモデルはOpenVINO IR(4ビット量子化)形式のモデル。
# KVキャッシュの量子化を無効化してみる
process = psutil.Process(os.getpid())
mem_before = process.memory_info().rss / 1024**2  # MB
start = time.time()
processor = AutoProcessor.from_pretrained(open_vino_save_path_int4a)
model = OVModelForCausalLM.from_pretrained(open_vino_save_path_int4a,
                                           ov_config={"KV_CACHE_PRECISION": "f16",
                                                      "PERFORMANCE_HINT": "LATENCY",
                                                      },
                                           )
messages = [
    {"role": "system", "content": "あなたは有能なコーディングAIです。"},
    {"role": "user", "content": "transformersとFAISSとstreamlitを使った、QAチャットボットをpythonで構築して。"},
]
processor = AutoProcessor.from_pretrained(model_path)
inputs = processor.apply_chat_template(
    messages,
    temperature=0.1,
    tokenize=True,
    return_dict=True,
    return_tensors="pt",
    add_generation_prompt=True,
    enable_thinking=False,
).to(model.device)
input_len = inputs["input_ids"].shape[-1]
outputs = model.generate(**inputs, max_new_tokens=4096)
response = processor.decode(outputs[0][input_len:], skip_special_tokens=False)
mem_after = process.memory_info().rss / 1024**2  # MB
end = time.time()
print(response)
print("=" * 60)
print(f"実行前メモリ使用量: {mem_before:.2f} MB")
print(f"実行後メモリ使用量: {mem_after:.2f} MB")
print(f"差引メモリ使用量: {mem_after - mem_before:.2f} MB")
print(f"実行時間: {end - start:.3f} 秒")
del model, processor
以下に基本的なコード例を示します。
まず、必要なライブラリをインストールしましょう:
pip install transformers faiss-cpu streamlit
次に、以下のようなPythonスクリプトを作成します。
import streamlit as st
from transformers import pipeline
# Q&Aモデルのロード
qa_pipeline = pipeline(“question-answering”, model=”distilbert-base-uncased-distilled-squad”)
def answer_question(question, context):
result = qa_pipeline(question=question, context=context)
return result[‘answer’]
st.title(‘Q&Aチャットボット’)
context = st.text_area(‘文脈を入力してください’)
question = st.text_input(‘質問を入力してください’)
if st.button(‘回答’):
if context and question:
answer = answer_question(question, context)
st.write(f’回答: {answer}’)
else:
st.write(‘文脈または質問が未入力です。’)
このスクリプトでは、Streamlitを使用してウェブインターフェースを作成し、ユーザーから文脈と質問を受け取ります。それらをHugging FaceのTransformersライブラリで使用したQ&Aモデルに送信して、回答を得ます。
ただし、この例では、FAISSを用いて効率的な検索を行う部分は含まれていません。FAISSを用いた検索機能を追加するためには、より複雑な設計が必要になります。
なお、上記のコードは非常に単純化されたものです。実際のアプリケーションでは、エラーハンドリング、セキュリティ対策、パフォーマンス最適化などの考慮が必要となる可能性があります。<|im_end|>
実行前メモリ使用量: 1452.83 MB
実行後メモリ使用量: 9407.55 MB
差引メモリ使用量: 7954.73 MB
実行時間: 72.236 秒
KVキャッシュの量子化をu4にもしてみる。
# KVキャッシュの量子化をu4にしてみる
process = psutil.Process(os.getpid())
mem_before = process.memory_info().rss / 1024**2  # MB
start = time.time()
processor = AutoProcessor.from_pretrained(open_vino_save_path_int4a)
model = OVModelForCausalLM.from_pretrained(open_vino_save_path_int4a,
                                           ov_config={"KV_CACHE_PRECISION": "u4",
                                                      "DYNAMIC_QUANTIZATION_GROUP_SIZE": "32",
                                                      "PERFORMANCE_HINT": "LATENCY",
                                                      },
                                           )
messages = [
    {"role": "system", "content": "あなたは有能なコーディングAIです。"},
    {"role": "user", "content": "transformersとFAISSとstreamlitを使った、QAチャットボットをpythonで構築して。"},
]
processor = AutoProcessor.from_pretrained(model_path)
inputs = processor.apply_chat_template(
    messages,
    temperature=0.1,
    tokenize=True,
    return_dict=True,
    return_tensors="pt",
    add_generation_prompt=True,
    enable_thinking=False,
).to(model.device)
input_len = inputs["input_ids"].shape[-1]
outputs = model.generate(**inputs, max_new_tokens=4096)
response = processor.decode(outputs[0][input_len:], skip_special_tokens=False)
mem_after = process.memory_info().rss / 1024**2  # MB
end = time.time()
print(response)
print("=" * 60)
print(f"実行前メモリ使用量: {mem_before:.2f} MB")
print(f"実行後メモリ使用量: {mem_after:.2f} MB")
print(f"差引メモリ使用量: {mem_after - mem_before:.2f} MB")
print(f"実行時間: {end - start:.3f} 秒")
del model, processor
もちろっきり、それはchatlit、具体的詳しく少しいて、すいて、そしていて、、、すえにいて。いいていててだして、。<|im_end|>
実行前メモリ使用量: 1321.38 MB
実行後メモリ使用量: 9436.15 MB
差引メモリ使用量: 8114.78 MB
実行時間: 11.552 秒
u4は何度やっても生成結果が壊れてしまう。
メモリ使用量をまとめるとこんな感じ。
| KVキャッシュ量子化 u8 | KVキャッシュ量子化 u4 | KVキャッシュの量子化 無効化 | |
|---|---|---|---|
| 消費メモリ | 8,185MB | 8,114MB | 7,954MB |
大きな差はなさそう…?
その他(GPU、NPU推論について)
GPUを使った推論はIntel製GPUまたはiGPU搭載CPUでのみ実行可能とのことなので、私の環境では試せず…。

NPUについても、Intel NPUを搭載したCPUを持っていないことからモデルの実行はできない。ただ、以下のドキュメントを参考にできるところまで検証した。

# NPUが認識されるかチェック
# ['CPU', 'GPU', 'NPU']のようにNPUが表示されればOK
import openvino as ov
core = ov.Core()
print("利用可能なデバイス:", core.available_devices)
for device in core.available_devices:
    print(device, core.get_property(device, "FULL_DEVICE_NAME"))
# 必要なライブラリのインポート
import openvino
import openvino_genai
import transformers
import nncf
print("OpenVINO   :", openvino.__version__)
print("Transformers:", transformers.__version__)
print("NNCF       :", nncf.__version__)
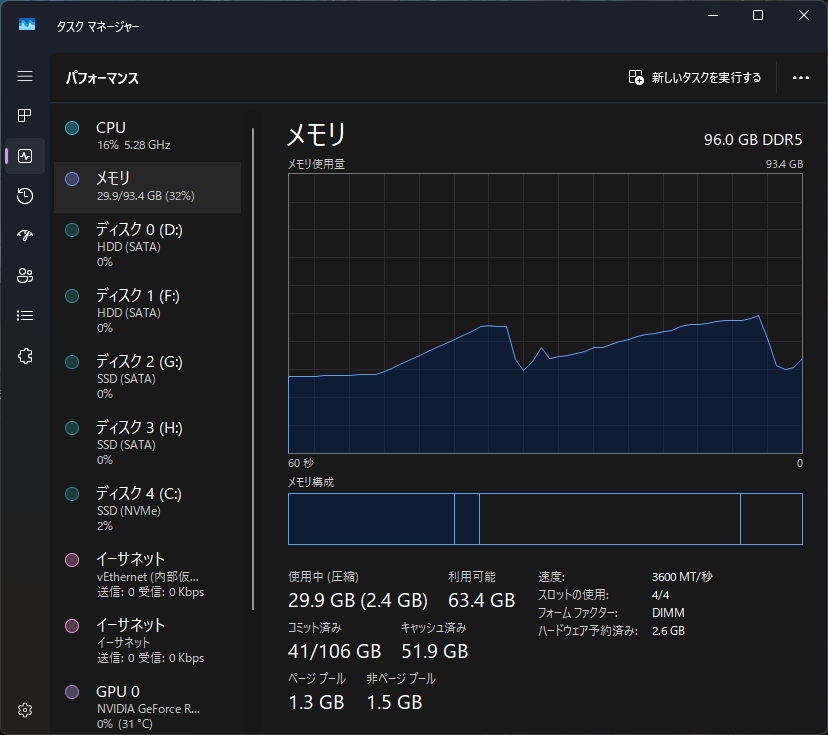
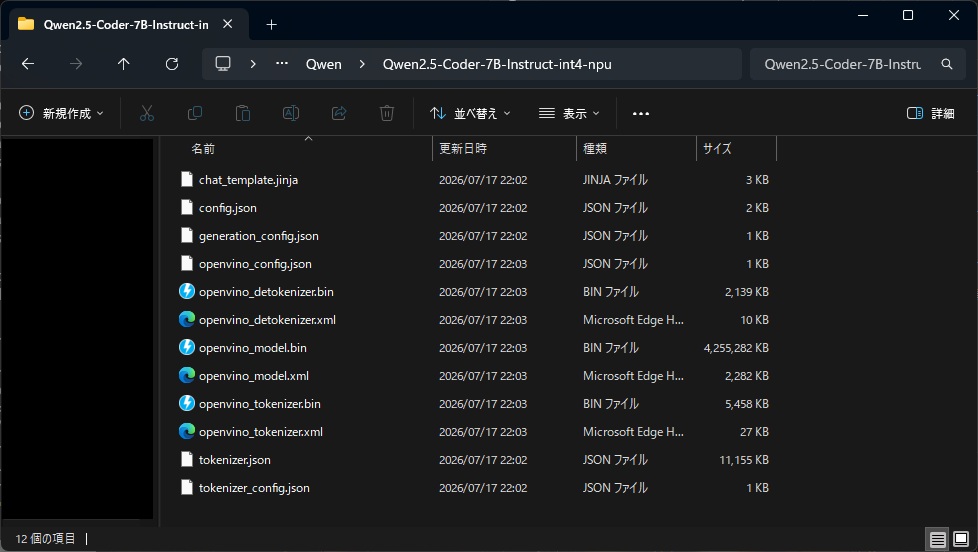
コマンドプロンプトからSafetensorsモデルをNPU向けに変換。仮想環境を立ち上げた状態で、以下のコマンドを叩けばOpenVINO IR(NPU用)にモデルを変換できる。
optimum-cli export openvino -m "H:\LLM_Models\safetensor\Qwen\Qwen2.5-Coder-7B-Instruct" --task text-generation-with-past --weight-format int4 --sym --ratio 1.0 --group-size -1 "H:\LLM_Models\open_vino\Qwen\Qwen2.5-Coder-7B-Instruct-int4-npu"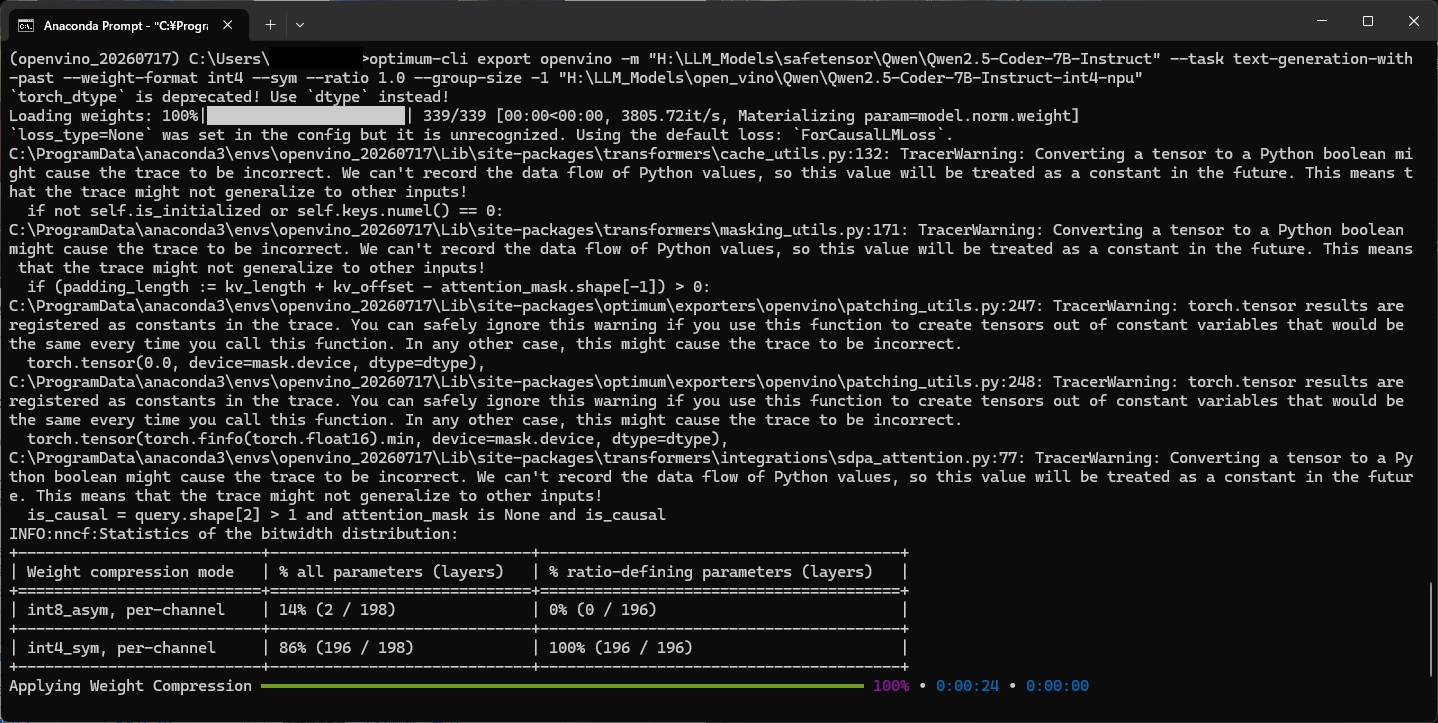
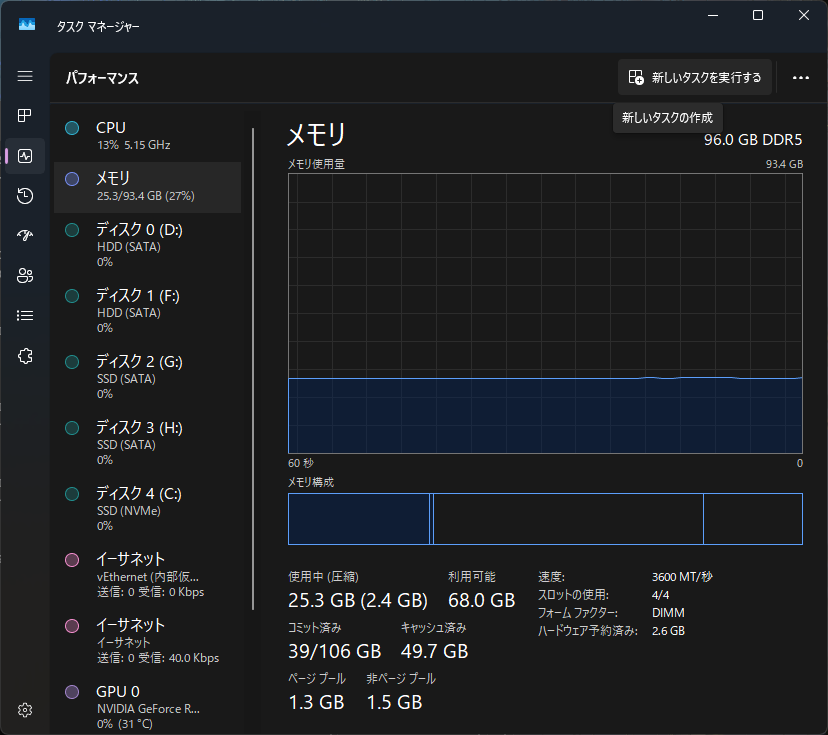
以下のようなコードでNPU推論ができる…はず(実行環境がないので妄想)。
import os
import time
import psutil
import openvino_genai as ov_genai
from transformers import AutoTokenizer
model_path = (
    r"H:\LLM_Models\open_vino\Qwen"
    r"\Qwen2.5-Coder-7B-Instruct-int4-npu"
)
process = psutil.Process(os.getpid())
mem_before = process.memory_info().rss / 1024**2
start = time.time()
tokenizer = AutoTokenizer.from_pretrained(
    model_path,
    trust_remote_code=True,
)
messages = [
    {
        "role": "system",
        "content": "あなたは有能なAIアシスタントです。",
    },
    {
        "role": "user",
        "content": (
            "Pythonで高速な素数判定関数を書いて、"
            "処理内容も説明してください。"
        ),
    },
]
prompt = tokenizer.apply_chat_template(
    messages,
    tokenize=False,
    add_generation_prompt=True,
)
pipeline_config = {
    "MAX_PROMPT_LEN": 1024,
    "MIN_RESPONSE_LEN": 128,
    "GENERATE_HINT": "BEST_PERF",
    "CACHE_DIR": os.path.join(model_path, "npu_cache"),
}
pipe = ov_genai.LLMPipeline(
    model_path,
    "NPU",
    pipeline_config,
)
result = pipe.generate(
    prompt,
    max_new_tokens=512,
    do_sample=False,
)
end = time.time()
mem_after = process.memory_info().rss / 1024**2
print(result)
print("=" * 60)
print(f"実行前メモリ使用量: {mem_before:.2f} MB")
print(f"実行後メモリ使用量: {mem_after:.2f} MB")
print(f"メモリ増加量      : {mem_after - mem_before:+.2f} MB")
print(f"実行時間          : {end - start:.3f} 秒")
コード・実行結果をHTML出力したもの
ここまでのコード・実行結果をHTMLに出力したものは以下のリンク先からどうぞ。

コメント